Harvester 1.5 introduces support for the provisioning of virtual machine root volumes and data volumes using external Container Storage Interface (CSI) drivers.
This article demonstrates how to use Velero 1.16.0 to perform backup and restore of virtual machines in Harvester.
It goes through commands and manifests to:
- Back up virtual machines in a namespace, their NFS CSI volumes, and associated namespace-scoped configuration
- Export the backup artifacts to an AWS S3 bucket
- Restore to a different namespace on the same cluster
- Restore to a different cluster
Velero is a Kubernetes-native backup and restore tool that enables users to perform scheduled and on-demand backups of virtual machines to external object storage providers such as S3, Azure Blob, or GCS, aligning with enterprise backup and disaster recovery practices.
note
The commands and manifests used in this article are tested with Harvester 1.5.1.
The CSI NFS driver and Velero configuration and versions used are for demonstration purposes only. Adjust them according to your environment and requirements.
important
The examples provided are intended to backup and restore Linux virtual machine workloads. It is not suitable for backing up guest clusters provisioned via the Harvester Rancher integration.
To backup and restore guest clusters like RKE2, please refer to the distro official documentation.
Harvester Installation
Refer to the Harvester documentation for installation requirements and options.
The kubeconfig file of the Harvester cluster can be retrieved following the instructions here.
Install and Configure Velero
Download the Velero CLI.
Set the following shell variables:
BUCKET_NAME=<your-s3-bucket-name>
BUCKET_REGION=<your-s3-bucket-region>
AWS_CREDENTIALS_FILE=<absolute-path-to-your-aws-credentials-file>
Install Velero on the Harvester cluster:
velero install \
  --provider aws \
  --features=EnableCSI \
  --plugins "velero/velero-plugin-for-aws:v1.12.0,quay.io/kubevirt/kubevirt-velero-plugin:v0.7.1" \
  --bucket "${BUCKET_NAME}" \
  --secret-file "${AWS_CREDENTIALS_FILE}" \
  --backup-location-config region="${BUCKET_REGION}" \
  --snapshot-location-config region="${BUCKET_REGION}" \
  --use-node-agent
In this setup, Velero is configured to:
- Run in the
veleronamespace - Enable CSI volume snapshot APIs
- Enable the built-in node agent data movement controllers and pods
- Use the
velero-plugin-for-awsplugin to manage interactions with the S3 object store - Use the
kubevirt-velero-pluginplugin to backup and restore KubeVirt resources
- Run in the
Confirm that Velero is installed and running:
kubectl -n velero get po
NAME                      READY   STATUS    RESTARTS         AGE
node-agent-875mr          1/1     Running   0                1d
velero-745645565f-5dqgr   1/1     Running   0                1d
Configure the velero CLI to output the backup and restore status of CSI objects:
velero client config set features=EnableCSI
Deploy the NFS CSI and Example Server
Follow the instructions in the NFS CSI documentation to set up the NFS CSI driver, its storage class, and an example NFS server.
The NFS CSI volume snapshotting capability must also be enabled following the instructions here.
Confirm that the NFS CSI and example server are running:
kubectl get po -A -l 'app in (csi-nfs-node,csi-nfs-controller,nfs-server)'
NAMESPACE     NAME                                  READY   STATUS    RESTARTS    AGE
default       nfs-server-b767db8c8-9ltt4            1/1     Running   0           1d
kube-system   csi-nfs-controller-5bf646f7cc-6vfxn   5/5     Running   0           1d
kube-system   csi-nfs-node-9z6pt                    3/3     Running   0           1d
The default NFS CSI storage class is named nfs-csi:
kubectl get sc nfs-csi
NAME      PROVISIONER      RECLAIMPOLICY   VOLUMEBINDINGMODE   ALLOWVOLUMEEXPANSION   AGE
nfs-csi   nfs.csi.k8s.io   Delete          Immediate           true                   14d
Confirm that the default NFS CSI volume snapshot class csi-nfs-snapclass is also installed:
kubectl get volumesnapshotclass csi-nfs-snapclass
NAME                DRIVER           DELETIONPOLICY   AGE
csi-nfs-snapclass   nfs.csi.k8s.io   Delete           14d
Preparing the Virtual Machine and Image
Create a custom namespace named demo-src:
kubectl create ns demo-src
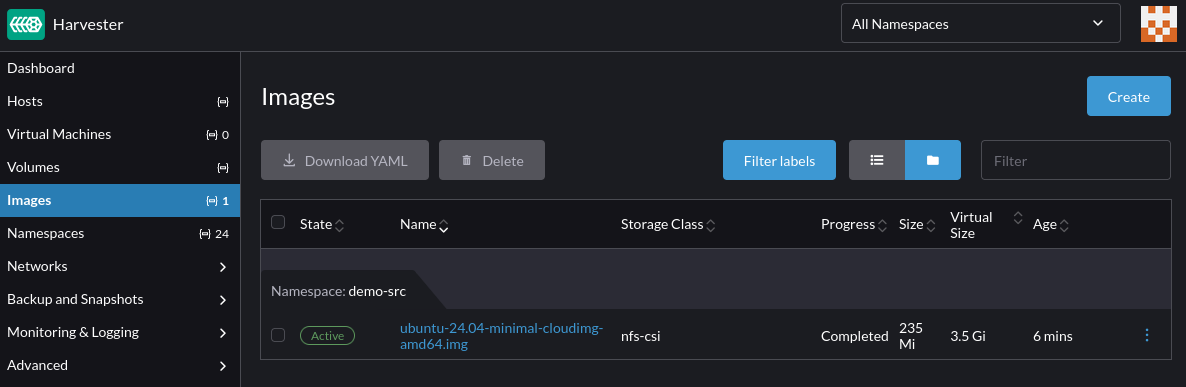
Follow the instructions in the Image Management documentation to upload the Ubuntu 24.04 raw image from https://cloud-images.ubuntu.com/minimal/releases/noble/ to Harvester.
The storage class of the image must be set to nfs-csi, per the Third-Party Storage Support documentation.
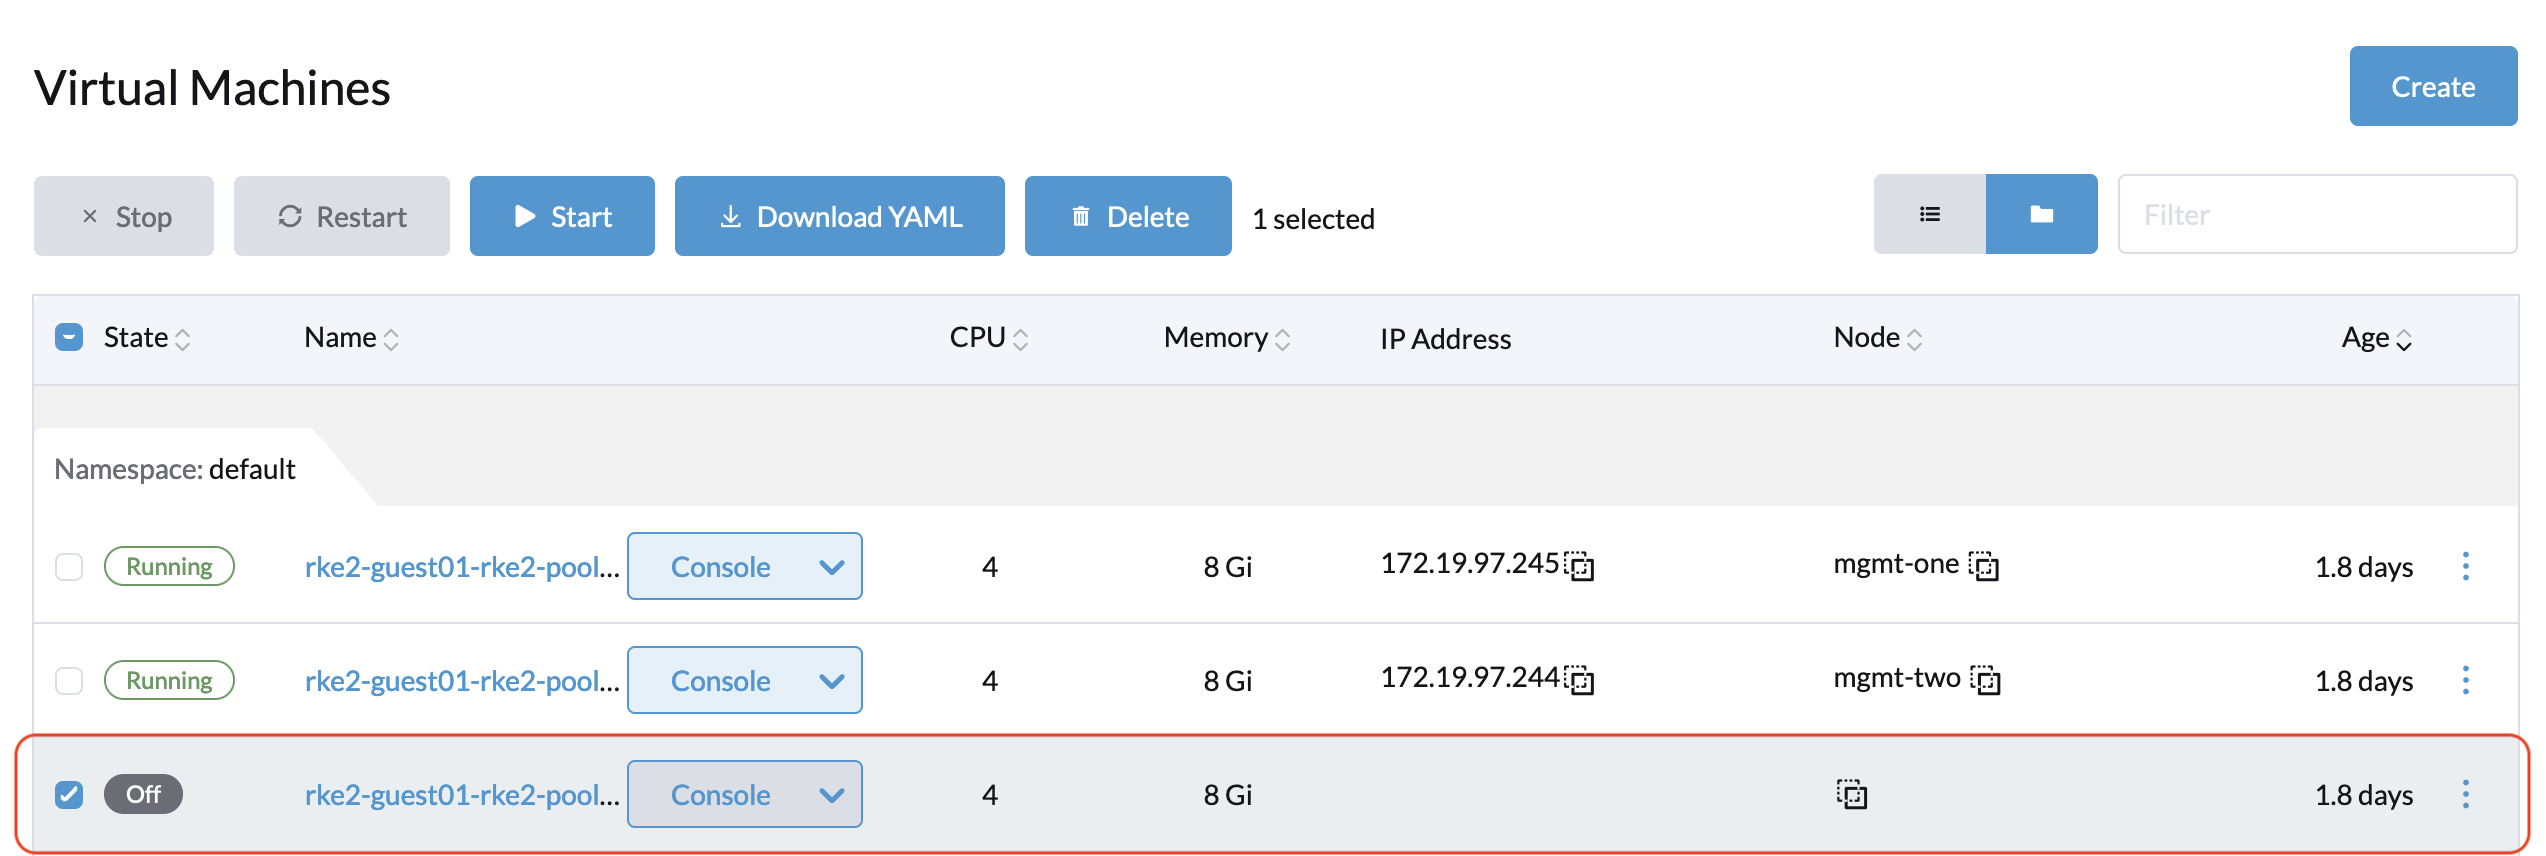
Confirm the virtual machine image is successfully uploaded to Harvester:
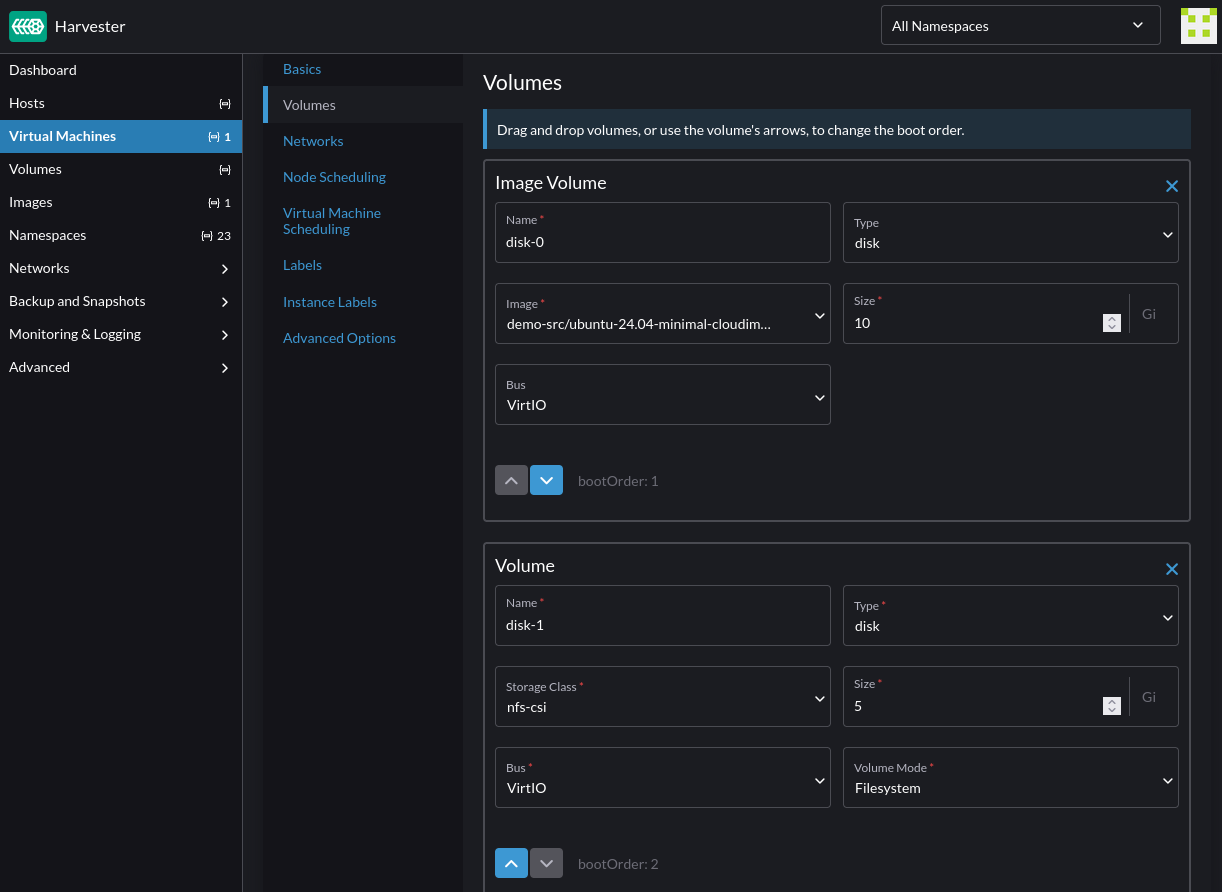
Follow the instructions in the third-party storage documentation to create a virtual machine with NFS root and data volumes, using the image uploaded in the previous step.
For NFS CSI snapshot to work, the NFS data volume must have the volumeMode set to Filesystem:
optional
For testing purposes, once the virtual machine is ready, access it via SSH and add some files to both the root and data volumes.
The data volume needs to be partitioned, with a file system created and mounted before files can be written to it.
Backup the Source Namespace
Use the velero CLI to create a backup of the demo-src namespace using Velero's built-in data mover:
BACKUP_NAME=backup-demo-src-`date "+%s"`

velero backup create "${BACKUP_NAME}" \
  --include-namespaces demo-src \
  --snapshot-move-data
info
For more information on Velero's data mover, see its documentation on CSI data snapshot movement capability.
This creates a backup of the demo-src namespace containing resources like the virtual machine created earlier, its volumes, secrets and other associated configuration.
Depending on the size of the virtual machine and its volumes, the backup may take a while to complete.
The DataUpload custom resources provide insights into the backup progress:
kubectl -n velero get datauploads -l velero.io/backup-name="${BACKUP_NAME}"
Confirm that the backup completed successfully:
velero backup get "${BACKUP_NAME}"
NAME                         STATUS      ERRORS   WARNINGS   CREATED                         EXPIRES   STORAGE LOCATION   SELECTOR
backup-demo-src-1747954979   Completed   0        0          2025-05-22 16:04:46 -0700 PDT   29d       default            <none>
After the backup completes, Velero removes the CSI snapshots from the storage side to free up the snapshot data space.
tips
The velero backup describe and velero backup logs commands can be used to assess details of the backup including resources included, skipped, and any warnings or errors encountered during the backup process.
Restore To A Different Namespace
This section describes how to restore the backup from the demo-src namespace to a new namespace named demo-dst.
Save the following restore modifier to a local file named modifier-data-volumes.yaml:
cat <<EOF > modifier-data-volumes.yaml
version: v1
resourceModifierRules:
- conditions:
    groupResource: persistentvolumeclaims
    matches:
    - path: /metadata/annotations/harvesterhci.io~1volumeForVirtualMachine
      value: "\"true\""
  patches:
  - operation: remove
    path: /metadata/annotations/harvesterhci.io~1volumeForVirtualMachine
EOF
This restore modifier removes the harvesterhci.io/volumeForVirtualMachine annotation from the virtual machine data volumes to ensure that the restoration do not conflict with the CDI volume import populator.
Create the restore modifier:
kubectl -n velero create cm modifier-data-volumes --from-file=modifier-data-volumes.yaml
Assign the backup name to a shell variable:
BACKUP_NAME=backup-demo-src-1747954979
Start the restore operation:
velero restore create \
  --from-backup "${BACKUP_NAME}" \
  --namespace-mappings "demo-src:demo-dst" \
  --exclude-resources "virtualmachineimages.harvesterhci.io" \
  --resource-modifier-configmap "modifier-data-volumes" \
  --labels "velero.kubevirt.io/clear-mac-address=true,velero.kubevirt.io/generate-new-firmware-uuid=true"
During the restore:
- The virtual machine MAC address and firmware UUID are reset to avoid potential conflicts with existing virtual machines.
- the virtual machine image manifest is excluded because Velero restores the entire state of the virtual machine from the backup.
- the
modifier-data-volumesrestore modifier is invoked to modify the virtual machine data volumes metadata to prevent conflicts with the CDI volume import populator.
While the restore operation is still in-progress, the DataDownload custom resources can be used to examine the progress of the operation:
RESTORE_NAME=backup-demo-src-1747954979-20250522164015

kubectl -n velero get datadownload -l velero.io/restore-name="${RESTORE_NAME}"
Confirm that the restore completed successfully:
velero restore get
NAME                                        BACKUP                       STATUS      STARTED                         COMPLETED                       ERRORS   WARNINGS   CREATED                         SELECTOR
backup-demo-src-1747954979-20250522164015   backup-demo-src-1747954979   Completed   2025-05-22 16:40:15 -0700 PDT   2025-05-22 16:40:49 -0700 PDT   0        6          2025-05-22 16:40:15 -0700 PDT   <none>
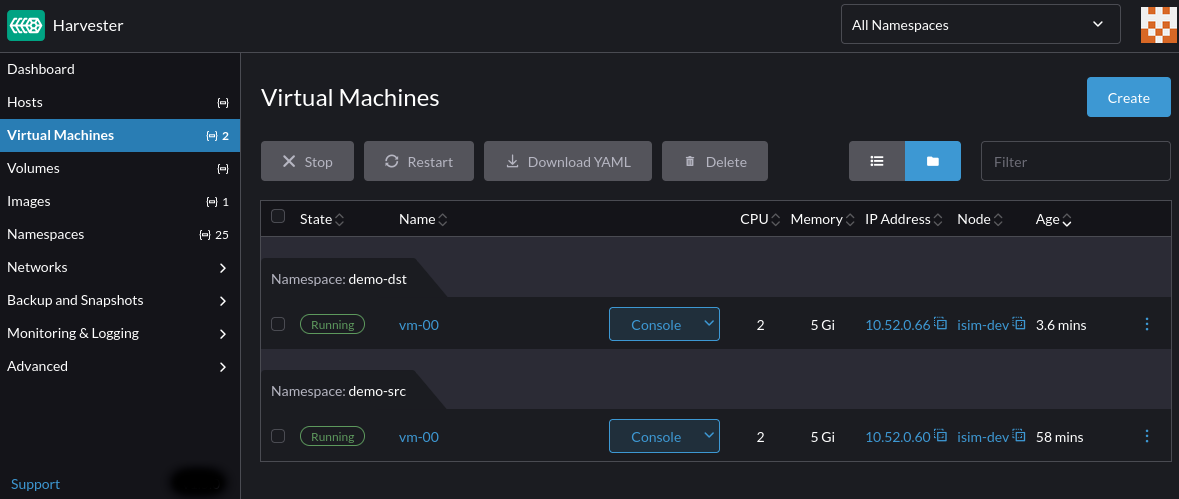
Verify that the virtual machine and its configuration are restored to the new demo-dst namespace:
note
Velero uses Kopia as its default data mover. This issue describes some of its limitations on advanced file system features such as setuid/gid, hard links, mount points, sockets, xattr, ACLs, etc.
Velero provides the --data-mover option to configure custom data movers to satisfy different use cases. For more information, see the Velero's documentation.
tips
The velero restore describe and velero restore logs commands provide more insights into the restore operation including the resources restored, skipped, and any warnings or errors encountered during the restore process.
Restore To A Different Cluster
This section extends the above scenario to demonstrate the steps to restore the backup to a different Harvester cluster.
On the target cluster, install Velero, and set up the NFS CSI and NFS server following the instructions from the Deploy the NFS CSI and Example Server section.
Once Velero is configured to use the same backup location as the source cluster, it automatically discovers the available backups:
velero backup get
NAME                         STATUS      ERRORS   WARNINGS   CREATED                         EXPIRES   STORAGE LOCATION   SELECTOR
backup-demo-src-1747954979   Completed   0        0          2025-05-22 16:04:46 -0700 PDT   29d       default            <none>
Follow the steps in the Restore To A Different Namespace section to restore the backup on the target cluster.
Remove the --namespace-mappings option to set the restored namespace to demo-src on the target cluster.
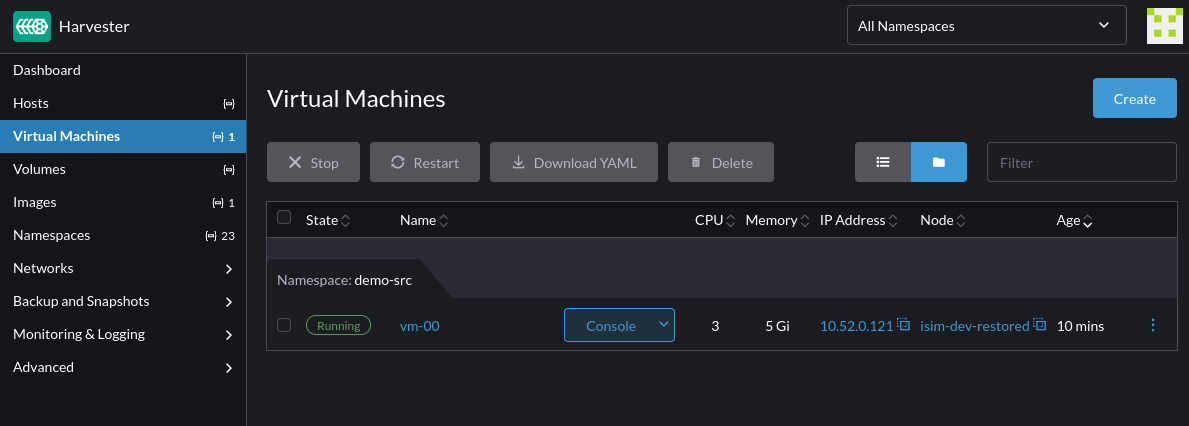
Confirm that the virtual machine and its configuration are restored to the demo-src namespace:
Select Longhorn Volume Snapshot Class
To perform Velero backup and restore of virtual machines with Longhorn volumes, label the Longhorn volume snapshot class longhorn as follows:
kubectl label volumesnapshotclass longhorn velero.io/csi-volumesnapshot-class
This helps Velero to find the correct Longhorn snapshot class to use during backup and restore.
Limitations
Enhancements related to the limitations described in this section are tracked at https://github.com/harvester/harvester/issues/8367.
By default, Velero only supports resource filtering by resource groups and labels. In order to backup/restore a single instance of virtual machine, custom labels must be applied to the virtual machine, and its virtual machine instance, pod, data volumes, persistent volumes claim, persistent volumes and
cloudinitsecret resources. It's recommended to backup the entire namespace and perform resource filtering during restore to ensure that backup contains all the dependency resources required by the virtual machine.The restoration of virtual machine image is not fully supported yet.