4 posts tagged with "csi"

View All Tags

· 13 min read

This article explains how to install the NetApp Trident CSI driver on a Harvester cluster. Once it's installed, VMs running in Harvester can store their volumes on a NetApp ONTAP storage system.

NetApp storage is added alongside Longhorn; it does not replace it. You can use any combination of these protocols:

  • NFS (ontap-nas)
  • iSCSI (ontap-san, sanType: iscsi)
  • NVMe/TCP (ontap-san, sanType: nvme)
  • Fibre Channel (ontap-san, sanType: fcp)

This procedure was tested with Harvester v1.9.0 and Trident 26.06.1 (Helm chart 100.2606.1), using ONTAP 9.16.1. With NFS, iSCSI and NVMe/TCP, the following worked on NetApp-backed volumes: booting VMs, live migration, online volume expansion, and Harvester VM snapshots. Trident also supports Fibre Channel, and the multipath configuration below covers FC LUNs. However, FC was not tested for this article.

note

This article replaces an earlier version (August 2023) written for Harvester v1.2.0 and Trident v23.07. The main changes:

  • Multipath is now configured with a Harvester CloudInit resource, instead of files edited by hand on every node.
  • Backends are now TridentBackendConfig resources, so tridentctl is no longer needed.
  • NFS and NVMe/TCP are now covered.
  • The extra ClusterRole for PSA (NetApp/trident#839) was not needed in testing.
  • Third-party volumes can now be used as VM boot volumes.

Prerequisites​

  • A Harvester cluster and its KubeConfig. To download it, open the Harvester UI, click Support in the lower left, then click Download KubeConfig.
  • A workstation with kubectl and helm that can reach the Harvester cluster.
  • An ONTAP SVM with:
    • A management LIF that the Harvester nodes can reach.
    • Data LIFs for each protocol you plan to use: NFS, iSCSI, NVMe/TCP and/or FC. NVMe/TCP requires the NVMe_oF license on the ONTAP system.
    • An ONTAP login for Trident with the http and ontapi applications enabled. The examples in this article use limitAggregateUsage, which requires a cluster-scoped login with the admin role. In that case, managementLIF is the cluster management LIF. If you use an SVM-scoped vsadmin login instead, set managementLIF to the SVM management LIF and remove limitAggregateUsage from the backends. See User permissions in the Trident documentation.
  • For FC only: FC HBAs in every Harvester node that mounts NetApp volumes, and fabric zoning between those HBAs and the SVM's FC LIFs.

Network design​

Trident's node plugin runs in the host network namespace, so the host's routing table decides which NIC carries storage traffic.

tip

Avoid sending storage traffic over the management network. It's shared with the cluster control plane and the pod network, and adds overhead. For production, use a dedicated cluster network on its own NICs, as described in the next section.

How Trident discovers data LIFs differs by protocol:

  • iSCSI / NVMe/TCP: Trident ignores dataLIF on SAN backends and logs Specifying data LIF is no longer supported for SAN backends. It asks ONTAP for every SAN LIF in the SVM, and each node logs in to all of them, so multipath works automatically. You only need managementLIF and svm.
  • NFS: dataLIF takes a single address. If you leave it out, Trident uses the first NFS LIF it finds in the SVM. Set it explicitly to choose the network that carries NFS traffic.
  • FC: traffic runs over the FC fabric, not the IP network, so the rest of this section does not apply. Only the management LIF must be reachable over IP.

Optional: a dedicated storage interface with HostNetworkConfig​

This takes two steps: create a cluster network on the storage NICs, then give each host an IP address on it with a HostNetworkConfig.

Step 1: create the cluster network. A cluster network groups the storage NICs into a bridge on each node. See Create a New Cluster Network for details.

  1. In the Harvester UI, go to Networks > ClusterNetworks/Configs and click Create. Name it, for example cn-storage.
  2. Click Create Network Config on the new cluster network.
  3. On the Node Selector tab, select the nodes that mount NetApp volumes. Select all nodes does not work if the cluster has a witness node. Select nodes by name, or by a label such as netapp-trident=enabled (see the note further down).
  4. On the Uplink tab, select the storage NICs, the bond mode, and the MTU. The MTU must match the switch ports and the ONTAP LIFs, for example 9000 for jumbo frames.
  5. Click Save.

The switch ports for these NICs must be trunk ports that carry the storage VLAN tagged.

Step 2: give the hosts an IP address on it. On its own, a cluster network carries only VM traffic, because the hosts have no IP address on it. A HostNetworkConfig (Networks > Host Networks) creates a VLAN sub-interface on the cluster network's bridge on each node and gives it an IP address. Traffic to the ONTAP data LIFs on that subnet then leaves through that interface instead of the management network. The ONTAP data LIFs must be on the same VLAN and subnet.

Example with static addresses on VLAN 150:

apiVersion: network.harvesterhci.io/v1beta1
kind: HostNetworkConfig
metadata:
name: netapp-storage
spec:
clusterNetwork: cn-storage
vlanID: 150
mode: static
nodeSelector:
matchLabels:
netapp-trident: enabled
ips:
<node-1>: 192.168.150.11/24
<node-2>: 192.168.150.12/24

Check the result on a node with ip addr show cn-storage-br.150. Each node's state is reported in the resource's status.nodeStatus.

Static mode and witness nodes

In static mode without a nodeSelector, the webhook requires an IP for every node in the cluster, witness included. Otherwise it rejects the resource with static IP not found for node <witness>. You have two options:

  • Add a nodeSelector, as in the example above. Only the matching nodes then need an entry in ips. The selector can use the same netapp-trident=enabled label that restricts the Trident node plugin. This way the witness is excluded from the storage network and from Trident consistently.
  • Give the witness an IP as well. It costs one address on the storage subnet. The witness never mounts volumes, so the address goes unused.

In static mode, new nodes are not configured automatically. Add their entry to ips (and the label, if you use one) when they join.

For iSCSI, you can add a second cluster network (or a second VLAN) with its own HostNetworkConfig and LIFs, so multipath has two independent paths.

1. Configure multipathd (iSCSI and FC)​

iSCSI and FC LUNs need multipathd, which is not enabled on Harvester by default. Both protocols present NetApp LUNs with vendor NETAPP and product LUN, so the same configuration covers them. The configuration below lets multipathd claim only NetApp LUNs. Every other device is blacklisted, so Longhorn and the local disks are never touched. Harvester's own /etc/multipath/conf.d/99-longhorn.conf is left as is.

caution

Never start multipathd before the NetApp-only configuration is in place. With its default configuration, multipathd claims local disks, including Longhorn disks, as dm multipath devices.

The following CloudInit resource writes /etc/multipath/conf.d/98-netapp.conf and enables multipathd on every node. It is re-applied on every boot. Save it as 01-cloudinit-netapp-multipathd.yaml:

# Persists across reboots: writes /etc/multipath/conf.d/98-netapp.conf (multipath ONLY claims NETAPP LUNs)
apiVersion: node.harvesterhci.io/v1beta1
kind: CloudInit
metadata:
name: netapp-multipathd
spec:
matchSelector: {}
filename: 98_netapp_multipathd.yaml
contents: |
name: "enable multipathd for NetApp Trident iSCSI/FC (NETAPP LUNs only)"
stages:
initramfs:
- files:
- path: /etc/multipath/conf.d/98-netapp.conf
permissions: 0644
owner: 0
group: 0
content: |
defaults {
user_friendly_names yes
find_multipaths no
# lets libmpathpersist (qemu-pr-helper) track SCSI-3 PR keys across paths, for shared disks (e.g. WSFC)
reservation_key file
# don't create kpartx maps for partitions that guests create on the LUNs
skip_kpartx yes
}
blacklist {
device {
vendor ".*"
product ".*"
}
}
blacklist_exceptions {
device {
vendor "NETAPP"
product "LUN.*"
}
}
network:
- name: "enable and start multipathd"
systemctl:
enable:
- multipathd
start:
- multipathd
kubectl apply -f 01-cloudinit-netapp-multipathd.yaml

The CloudInit resource takes effect the next time each node boots. To apply it now without rebooting, run the following on each node as root. It writes the same file and starts multipathd, and stops at the first failure:

set -e
mkdir -p /etc/multipath/conf.d
cat > /etc/multipath/conf.d/98-netapp.conf <<'EOF'
defaults {
user_friendly_names yes
find_multipaths no
reservation_key file
skip_kpartx yes
}
blacklist {
device {
vendor ".*"
product ".*"
}
}
blacklist_exceptions {
device {
vendor "NETAPP"
product "LUN.*"
}
}
EOF
systemctl enable --now multipathd
multipath -ll # must not list any local disk
note
  • NVMe/TCP does not use dm-multipath. It uses native NVMe multipath, which is already enabled in the Harvester kernel, and doesn't need nvme-cli on the host.
  • NFS needs no host configuration.

Check that every node has a unique iSCSI initiator name. Nodes cloned from the same image can end up with the same name in /etc/iscsi/initiatorname.iscsi. ONTAP then treats those nodes as a single host. If you change a node's IQN, restart that node's trident-node-linux pod afterwards. Trident caches the IQN, and with a stale one volume staging fails with no devices present yet.

2. Install the Trident operator​

helm repo add netapp-trident https://netapp.github.io/trident-helm-chart
helm repo update
helm search repo netapp-trident --versions | head

helm upgrade --install trident netapp-trident/trident-operator --version 100.2606.1 \
--namespace trident --create-namespace --wait

Wait until the trident-controller pod and one trident-node-linux pod per node are Running:

kubectl -n trident get pods -o wide
Optional: run the node plugin only on selected nodes

By default, the trident-node-linux DaemonSet tolerates all NoSchedule and NoExecute taints, so it runs on every node, including a witness node. A witness node only runs etcd and never mounts volumes, so you may want to keep Trident off it. The same approach works for keeping Trident on any subset of nodes that host NetApp-backed VMs.

Label the nodes that should mount NetApp volumes, then pass the label to the chart:

kubectl label node <node-1> <node-2> netapp-trident=enabled --overwrite

helm upgrade --install trident netapp-trident/trident-operator --version 100.2606.1 \
--namespace trident --create-namespace --wait \
--set tridentNodePluginNodeSelector.netapp-trident=enabled

When you add a node to the cluster later, label it too. Otherwise VMs scheduled on it cannot mount NetApp volumes.

If you use a dedicated storage interface, use the same label as the HostNetworkConfig nodeSelector. Then the nodes that run Trident and the nodes with an IP on the storage network are always the same set.

VMs using NetApp volumes must only run on the labelled nodes. A Harvester witness node never runs VMs, so this needs no extra configuration in the witness case.

3. Create the ONTAP credentials Secret​

kubectl -n trident create secret generic netapp-creds \
--from-literal=username=<ontap user> \
--from-literal=password='<ontap password>'

4. Create the backends​

Create one TridentBackendConfig per protocol you use; you can drop any you don't need.

The examples below use these settings:

  • Thin provisioning: spaceReserve: none and snapshotReserve: "0".
  • limitAggregateUsage: "80%": Trident stops creating new volumes once the aggregate passes 80% used.

If several Kubernetes or Harvester clusters share one SVM, give each cluster a unique backendName and set storagePrefix (for example storagePrefix: hv1_). That keeps volume names from colliding and makes each cluster's volumes easy to identify in ONTAP.

For Fibre Channel, copy the iSCSI backend below, then change name and backendName (for example to netapp-fc) and set sanType: fcp. Then add a matching StorageClass in step 5 with storagePools: "netapp-fc:.*". FC was not tested for this article.

Save as 03-backends.yaml, replacing the <...> values:

# NFS
apiVersion: trident.netapp.io/v1
kind: TridentBackendConfig
metadata:
name: netapp-nas
namespace: trident
spec:
version: 1
storageDriverName: ontap-nas
backendName: netapp-nas
managementLIF: <management LIF IP>
dataLIF: <NFS data LIF IP> # optional; defaults to the first NFS LIF in the SVM
svm: <svm name>
autoExportPolicy: true
autoExportCIDRs: ["<storage network CIDR>"]
nfsMountOptions: "nfsvers=4.1"
limitAggregateUsage: "80%"
credentials:
name: netapp-creds
defaults:
spaceReserve: none
snapshotReserve: "0"
---
# iSCSI (all iSCSI LIFs in the SVM are discovered; no dataLIF)
apiVersion: trident.netapp.io/v1
kind: TridentBackendConfig
metadata:
name: netapp-iscsi
namespace: trident
spec:
version: 1
storageDriverName: ontap-san
sanType: iscsi
backendName: netapp-iscsi
managementLIF: <management LIF IP>
svm: <svm name>
limitAggregateUsage: "80%"
credentials:
name: netapp-creds
defaults:
spaceReserve: none
snapshotReserve: "0"
---
# NVMe/TCP (all NVMe LIFs in the SVM are discovered; no dataLIF)
apiVersion: trident.netapp.io/v1
kind: TridentBackendConfig
metadata:
name: netapp-nvme
namespace: trident
spec:
version: 1
storageDriverName: ontap-san
sanType: nvme
backendName: netapp-nvme
managementLIF: <management LIF IP>
svm: <svm name>
limitAggregateUsage: "80%"
credentials:
name: netapp-creds
defaults:
spaceReserve: none
snapshotReserve: "0"
kubectl apply -f 03-backends.yaml
kubectl -n trident get tridentbackendconfigs

Every backend must report PHASE Bound and STATUS Success. If one doesn't, kubectl -n trident describe tridentbackendconfig <name> shows the error.

5. Create the StorageClasses and VolumeSnapshotClass​

Trident StorageClasses have no sanType parameter. A StorageClass with only backendType: ontap-san can place a volume on any SAN backend: iSCSI, NVMe/TCP or FC. To prevent that, pin each class to its backend with storagePools: "<backendName>:.*".

Save as 04-storageclasses.yaml:

apiVersion: storage.k8s.io/v1
kind: StorageClass
metadata:
name: netapp-nfs
provisioner: csi.trident.netapp.io
parameters:
backendType: "ontap-nas"
storagePools: "netapp-nas:.*"
reclaimPolicy: Delete
volumeBindingMode: Immediate
allowVolumeExpansion: true
---
apiVersion: storage.k8s.io/v1
kind: StorageClass
metadata:
name: netapp-iscsi
provisioner: csi.trident.netapp.io
parameters:
backendType: "ontap-san"
storagePools: "netapp-iscsi:.*"
fsType: "ext4"
reclaimPolicy: Delete
volumeBindingMode: Immediate
allowVolumeExpansion: true
---
apiVersion: storage.k8s.io/v1
kind: StorageClass
metadata:
name: netapp-nvme
provisioner: csi.trident.netapp.io
parameters:
backendType: "ontap-san"
storagePools: "netapp-nvme:.*"
fsType: "ext4"
reclaimPolicy: Delete
volumeBindingMode: Immediate
allowVolumeExpansion: true
---
apiVersion: snapshot.storage.k8s.io/v1
kind: VolumeSnapshotClass
metadata:
name: trident-snapshotclass
driver: csi.trident.netapp.io
deletionPolicy: Delete
kubectl apply -f 04-storageclasses.yaml

Live migration requires ReadWriteMany volumes. CDI already knows Trident's defaults:

  • ontap-san (iSCSI, NVMe/TCP and FC): ReadWriteMany with volumeMode: Block.
  • ontap-nas: ReadWriteMany with volumeMode: Filesystem.

So these StorageClasses don't need the cdi.harvesterhci.io/storageProfileVolumeModeAccessModes annotation.

6. Register Trident for Harvester VM snapshots​

Harvester needs to know which VolumeSnapshotClass to use for Trident volumes.

  1. In the Harvester UI, go to Advanced > Settings, find csi-driver-config, and select ⋮ > Edit Setting.
  2. Click Add, then fill in the fields:
    • Provisioner: csi.trident.netapp.io
    • Volume Snapshot Class Name: trident-snapshotclass
  3. Save.

Leave Backup Volume Snapshot Class Name empty. In Harvester v1.9, VM backups only work with Longhorn volumes. VM snapshots of Trident volumes work. See Third-Party Storage Support.

The resulting entry in the setting's JSON value is:

"csi.trident.netapp.io": {
"volumeSnapshotClassName": "trident-snapshotclass",
"backupVolumeSnapshotClassName": ""
}

7. Use it​

The new StorageClasses now appear when you create a volume, a VM image or a VM in the Harvester UI. A quick check:

  1. Create a VM whose root disk uses netapp-iscsi, netapp-nvme or netapp-nfs.
  2. Start the VM, live-migrate it to another node, and take a VM snapshot.
  3. On a node running the VM, multipath -ll (iSCSI) or ls /sys/class/nvme-subsystem (NVMe) shows the NetApp devices.

Troubleshooting​

  • Backends go offline after the ONTAP system was unreachable. If they don't recover on their own, restart the controller: kubectl -n trident rollout restart deploy/trident-controller.
  • Deleted volumes still use space on ONTAP. ONTAP keeps deleted volumes in the volume recovery queue for 12 hours. While a deleted FlexClone (such as a VM disk cloned from an image) sits in the queue, its parent snapshot stays busy, so the parent volume and its VolumeSnapshot can't be deleted. To free them immediately, run on ONTAP: set -privilege advanced; volume recovery-queue purge-all -vserver <svm name>.
  • multipath -ll lists local disks. multipathd was started without the NetApp-only configuration. Put 98-netapp.conf in place, flush the unused maps with multipath -F, and restart multipathd.
  • iSCSI volumes fail to stage with no devices present yet. Check for duplicate initiator names across nodes, and for a stale IQN in Trident (see step 1).


References​

· 5 min read
Webber Huang

In this Harvester Knowledge Base article, Ivan Sim provided comprehensive guidance on using Velero to perform backup and restore operations for VMs with external storage in Harvester.

However, in certain scenarios, users may require the VM filesystem to be quiesced during Velero backup creation to prevent data corruption, especially when the VM is experiencing heavy I/O operations.

This article describes how to customize Velero Backup Hooks to implement filesystem freeze during Velero backup processing, ensuring data consistency in the backup content.

Background Knowledge​

KubeVirt's virt-freezer provides a mechanism to freeze and thaw guest filesystems. This capability can be leveraged to ensure filesystem consistency during VM backups. However, certain prerequisites must be met for filesystem freeze/thaw operations to function properly:

Prerequisites for Filesystem Freeze​

  • QEMU Guest Agent must be enabled in the guest VM
    • Verify this by checking if the VMI has AgentConnected in its status
  • Guest VM must be properly configured for related libvirt commands
    • When virt-freezer is triggered, KubeVirt communicates with the QEMU Guest Agent via libvirt commands such as guest-fsfreeze-freeze
    • The guest agent translates these commands to OS-specific calls:
      • Linux systems: Uses fsfreeze syscalls
      • Windows systems: Uses VSS (Volume Shadow Copy Service) APIs

Common Configuration Challenges​

Based on Harvester project experience, some guest operating systems require additional configuration:

  • Linux distributions (e.g., RHEL, SLE Micro): May lack sufficient permissions for filesystem freeze operations by default, requiring custom policies
  • Windows guests: Require the VSS service to be enabled for filesystem freeze functionality

Important: Filesystem freeze/thaw functionality depends on guest VM configuration, which is outside Harvester's control. Users are responsible for ensuring compatibility before implementing Velero backup hooks with filesystem freeze.

Verifying Filesystem Freeze Compatibility​

To confirm that your VM supports filesystem freeze operations:

  1. Access the virtual machine's virt-launcher compute container:

    POD=$(kubectl get pods -n <VM Namespace> \
    -l vm.kubevirt.io/name=<VM Name> \
    -o jsonpath='{.items[0].metadata.name}')
    kubectl exec -it $POD -n default -c compute -- bash
  2. Test filesystem freeze using the virt-freezer application available in the compute container:

    virt-freezer --freeze --namespace <VM namespace> --name <VM name>
  3. Critical: Always verify the freeze operation result and thaw the VM filesystems before performing any other operations

Prerequisites​

All preparation steps outlined in External CSI Storage Backup and Restore With Velero are mandatory, including:

  • Harvester installation and configuration
  • Velero installation and setup
  • S3-compatible storage configuration
  • Proper networking and permissions

Implementing Filesystem Freeze Hooks for VM Backup Consistency​

Velero supports pre and post backup hooks that can be integrated with KubeVirt's virt-freezer to ensure filesystem consistency during VM backups.

Configuring VM Template Annotations​

For all VMs requiring data consistency, add the following annotations to the VM template:

apiVersion: kubevirt.io/v1
kind: VirtualMachine
metadata:
name: vm-nfs
namespace: demo
spec:
template:
metadata:
annotations:
# These annotations will be applied to the virt-launcher pod
pre.hook.backup.velero.io/command: '["/usr/bin/virt-freezer", "--freeze", "--namespace", "<VM Namespace>", "--name", "<VM Name>"']'
pre.hook.backup.velero.io/container: compute
pre.hook.backup.velero.io/on-error: Fail
pre.hook.backup.velero.io/timeout: 30s

post.hook.backup.velero.io/command: '["/usr/bin/virt-freezer", "--unfreeze", "--namespace", "<VM Namespace>", "--name", "<VM Name>"]'
post.hook.backup.velero.io/container: compute
post.hook.backup.velero.io/timeout: 30s
spec:
# ...rest of VM spec...

These annotations will be propagated to the related virt-launcher pod and instruct Velero to:

  • Freeze the VM filesystem before backup creation begins
  • Thaw the VM filesystem after backup completion

Important: Replace <VM Namespace> and <VM Name> with the actual namespace and name of your VM.

Creating a Velero Backup with Filesystem Freeze​

After applying the Velero pre/post hook annotations to the VM manifest, follow the backup procedures described in External CSI Storage Backup and Restore With Velero.

Verifying Successful Hook Execution​

If the guest VM is configured correctly, the Velero backup will complete successfully with HooksAttempted indicating successful hook execution.

Check the backup status using:

velero backup describe [Backup Name] --details

Example output showing successful hook execution:

Name:         demo
Namespace: velero
Labels: velero.io/storage-location=default
Annotations: velero.io/resource-timeout=10m0s
velero.io/source-cluster-k8s-gitversion=v1.33.3+rke2r1
velero.io/source-cluster-k8s-major-version=1
velero.io/source-cluster-k8s-minor-version=33

Phase: Completed


Namespaces:
Included: demo
Excluded: <none>

Resources:
Included: *
Excluded: <none>
Cluster-scoped: auto

Label selector: <none>

Or label selector: <none>

Storage Location: default

Velero-Native Snapshot PVs: auto
Snapshot Move Data: true
Data Mover: velero

....

Backup Volumes:
Velero-Native Snapshots: <none included>

CSI Snapshots:
demo/vm-nfs-disk-0-au2ej:
Data Movement:
Operation ID: du-be5417aa-498e-4b93-b59f-e6498f95a6df.d7f97dab-3bb1-41e189381
Data Mover: velero
Uploader Type: kopia
Moved data Size (bytes): 5368709120
Result: succeeded

Pod Volume Backups: <none included>

HooksAttempted: 2
HooksFailed: 0

The output shows that Velero pre/post backup hooks completed successfully. In this case, the hooks are connected to guest VM filesystem freeze and thaw operations to ensure data consistency.

Restoring the Velero Backup​

Follow the restoration procedures described in External CSI Storage Backup and Restore With Velero to restore the namespace using Velero.

Troubleshooting​

If you encounter issues with filesystem freeze operations:

  1. Verify QEMU Guest Agent status in the VMI
  2. Check guest OS configuration for filesystem freeze support
  3. Review Velero hook logs for specific error messages
  4. Test virt-freezer manually as described in the verification section

Conclusion​

Implementing filesystem freeze hooks with Velero ensures data consistency during VM backups by quiescing the filesystem before snapshot creation. This approach is particularly valuable for VMs with high I/O activity or critical data that requires point-in-time consistency guarantees.

· 8 min read
Ivan Sim

Harvester 1.5 introduces support for the provisioning of virtual machine root volumes and data volumes using external Container Storage Interface (CSI) drivers.

This article demonstrates how to use Velero 1.16.0 to perform backup and restore of virtual machines in Harvester.

It goes through commands and manifests to:

  • Back up virtual machines in a namespace, their NFS CSI volumes, and associated namespace-scoped configuration
  • Export the backup artifacts to an AWS S3 bucket
  • Restore to a different namespace on the same cluster
  • Restore to a different cluster

Velero is a Kubernetes-native backup and restore tool that enables users to perform scheduled and on-demand backups of virtual machines to external object storage providers such as S3, Azure Blob, or GCS, aligning with enterprise backup and disaster recovery practices.

note

The commands and manifests used in this article are tested with Harvester 1.5.1.

The CSI NFS driver and Velero configuration and versions used are for demonstration purposes only. Adjust them according to your environment and requirements.

important

The examples provided are intended to backup and restore Linux virtual machine workloads. It is not suitable for backing up guest clusters provisioned via the Harvester Rancher integration.

To backup and restore guest clusters like RKE2, please refer to the distro official documentation.

Harvester Installation​

Refer to the Harvester documentation for installation requirements and options.

The kubeconfig file of the Harvester cluster can be retrieved following the instructions here.

Install and Configure Velero​

Download the Velero CLI.

Set the following shell variables:

BUCKET_NAME=<your-s3-bucket-name>
BUCKET_REGION=<your-s3-bucket-region>
AWS_CREDENTIALS_FILE=<absolute-path-to-your-aws-credentials-file>

Install Velero on the Harvester cluster:

velero install \
--provider aws \
--features=EnableCSI \
--plugins "velero/velero-plugin-for-aws:v1.12.0,quay.io/kubevirt/kubevirt-velero-plugin:v0.7.1" \
--bucket "${BUCKET_NAME}" \
--secret-file "${AWS_CREDENTIALS_FILE}" \
--backup-location-config region="${BUCKET_REGION}" \
--snapshot-location-config region="${BUCKET_REGION}" \
--use-node-agent
  • In this setup, Velero is configured to:

    • Run in the velero namespace
    • Enable CSI volume snapshot APIs
    • Enable the built-in node agent data movement controllers and pods
    • Use the velero-plugin-for-aws plugin to manage interactions with the S3 object store
    • Use the kubevirt-velero-plugin plugin to backup and restore KubeVirt resources

Confirm that Velero is installed and running:

kubectl -n velero get po
NAME                      READY   STATUS    RESTARTS         AGE
node-agent-875mr 1/1 Running 0 1d
velero-745645565f-5dqgr 1/1 Running 0 1d

Configure the velero CLI to output the backup and restore status of CSI objects:

velero client config set features=EnableCSI

Deploy the NFS CSI and Example Server​

Follow the instructions in the NFS CSI documentation to set up the NFS CSI driver, its storage class, and an example NFS server.

The NFS CSI volume snapshotting capability must also be enabled following the instructions here.

Confirm that the NFS CSI and example server are running:

kubectl get po -A -l 'app in (csi-nfs-node,csi-nfs-controller,nfs-server)'
NAMESPACE     NAME                                  READY   STATUS    RESTARTS    AGE
default nfs-server-b767db8c8-9ltt4 1/1 Running 0 1d
kube-system csi-nfs-controller-5bf646f7cc-6vfxn 5/5 Running 0 1d
kube-system csi-nfs-node-9z6pt 3/3 Running 0 1d

The default NFS CSI storage class is named nfs-csi:

kubectl get sc nfs-csi
NAME      PROVISIONER      RECLAIMPOLICY   VOLUMEBINDINGMODE   ALLOWVOLUMEEXPANSION   AGE
nfs-csi nfs.csi.k8s.io Delete Immediate true 14d

Confirm that the default NFS CSI volume snapshot class csi-nfs-snapclass is also installed:

kubectl get volumesnapshotclass csi-nfs-snapclass
NAME                DRIVER           DELETIONPOLICY   AGE
csi-nfs-snapclass nfs.csi.k8s.io Delete 14d

Preparing the Virtual Machine and Image​

Create a custom namespace named demo-src:

kubectl create ns demo-src

Follow the instructions in the Image Management documentation to upload the Ubuntu 24.04 raw image from https://cloud-images.ubuntu.com/minimal/releases/noble/ to Harvester.

The storage class of the image must be set to nfs-csi, per the Third-Party Storage Support documentation.

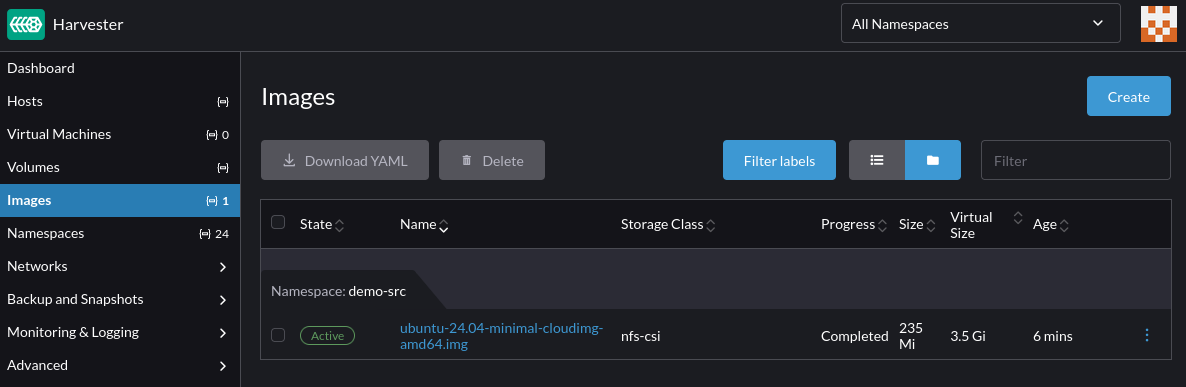
Confirm the virtual machine image is successfully uploaded to Harvester:

image

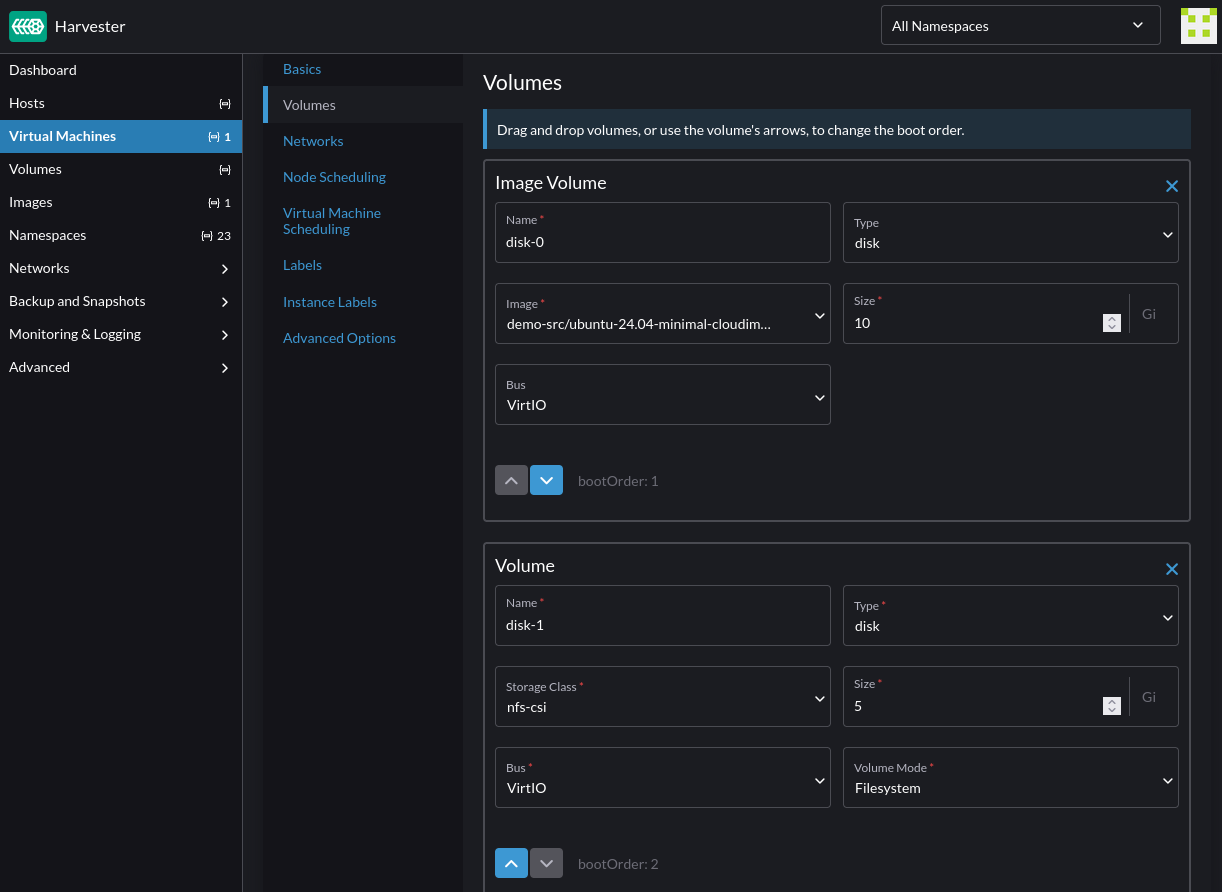
Follow the instructions in the third-party storage documentation to create a virtual machine with NFS root and data volumes, using the image uploaded in the previous step.

For NFS CSI snapshot to work, the NFS data volume must have the volumeMode set to Filesystem: image

optional

For testing purposes, once the virtual machine is ready, access it via SSH and add some files to both the root and data volumes.

The data volume needs to be partitioned, with a file system created and mounted before files can be written to it.

Backup the Source Namespace​

Use the velero CLI to create a backup of the demo-src namespace using Velero's built-in data mover:

BACKUP_NAME=backup-demo-src-`date "+%s"`

velero backup create "${BACKUP_NAME}" \
--include-namespaces demo-src \
--snapshot-move-data
info

For more information on Velero's data mover, see its documentation on CSI data snapshot movement capability.

This creates a backup of the demo-src namespace containing resources like the virtual machine created earlier, its volumes, secrets and other associated configuration.

Depending on the size of the virtual machine and its volumes, the backup may take a while to complete.

The DataUpload custom resources provide insights into the backup progress:

kubectl -n velero get datauploads -l velero.io/backup-name="${BACKUP_NAME}"

Confirm that the backup completed successfully:

velero backup get "${BACKUP_NAME}"
NAME                         STATUS      ERRORS   WARNINGS   CREATED                         EXPIRES   STORAGE LOCATION   SELECTOR
backup-demo-src-1747954979 Completed 0 0 2025-05-22 16:04:46 -0700 PDT 29d default <none>

After the backup completes, Velero removes the CSI snapshots from the storage side to free up the snapshot data space.

tips

The velero backup describe and velero backup logs commands can be used to assess details of the backup including resources included, skipped, and any warnings or errors encountered during the backup process.

Restore To A Different Namespace​

This section describes how to restore the backup from the demo-src namespace to a new namespace named demo-dst.

Save the following restore modifier to a local file named modifier-data-volumes.yaml:

cat <<EOF > modifier-data-volumes.yaml
version: v1
resourceModifierRules:
- conditions:
groupResource: persistentvolumeclaims
matches:
- path: /metadata/annotations/harvesterhci.io~1volumeForVirtualMachine
value: "\"true\""
patches:
- operation: remove
path: /metadata/annotations/harvesterhci.io~1volumeForVirtualMachine
EOF

This restore modifier removes the harvesterhci.io/volumeForVirtualMachine annotation from the virtual machine data volumes to ensure that the restoration do not conflict with the CDI volume import populator.

Create the restore modifier:

kubectl -n velero create cm modifier-data-volumes --from-file=modifier-data-volumes.yaml

Assign the backup name to a shell variable:

BACKUP_NAME=backup-demo-src-1747954979

Start the restore operation:

velero restore create \
--from-backup "${BACKUP_NAME}" \
--namespace-mappings "demo-src:demo-dst" \
--exclude-resources "virtualmachineimages.harvesterhci.io" \
--resource-modifier-configmap "modifier-data-volumes" \
--labels "velero.kubevirt.io/clear-mac-address=true,velero.kubevirt.io/generate-new-firmware-uuid=true"
  • During the restore:

    • The virtual machine MAC address and firmware UUID are reset to avoid potential conflicts with existing virtual machines.
    • the virtual machine image manifest is excluded because Velero restores the entire state of the virtual machine from the backup.
    • the modifier-data-volumes restore modifier is invoked to modify the virtual machine data volumes metadata to prevent conflicts with the CDI volume import populator.

While the restore operation is still in-progress, the DataDownload custom resources can be used to examine the progress of the operation:

RESTORE_NAME=backup-demo-src-1747954979-20250522164015

kubectl -n velero get datadownload -l velero.io/restore-name="${RESTORE_NAME}"

Confirm that the restore completed successfully:

velero restore get
NAME                                        BACKUP                       STATUS      STARTED                         COMPLETED                       ERRORS   WARNINGS   CREATED                         SELECTOR
backup-demo-src-1747954979-20250522164015 backup-demo-src-1747954979 Completed 2025-05-22 16:40:15 -0700 PDT 2025-05-22 16:40:49 -0700 PDT 0 6 2025-05-22 16:40:15 -0700 PDT <none>

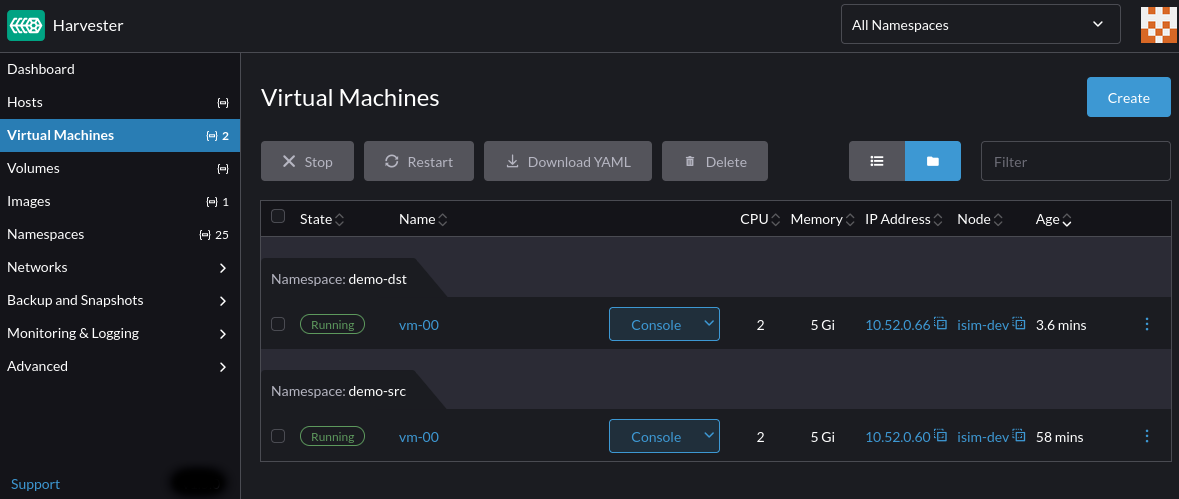
Verify that the virtual machine and its configuration are restored to the new demo-dst namespace:

image

note

Velero uses Kopia as its default data mover. This issue describes some of its limitations on advanced file system features such as setuid/gid, hard links, mount points, sockets, xattr, ACLs, etc.

Velero provides the --data-mover option to configure custom data movers to satisfy different use cases. For more information, see the Velero's documentation.

tips

The velero restore describe and velero restore logs commands provide more insights into the restore operation including the resources restored, skipped, and any warnings or errors encountered during the restore process.

Restore To A Different Cluster​

This section extends the above scenario to demonstrate the steps to restore the backup to a different Harvester cluster.

On the target cluster, install Velero, and set up the NFS CSI and NFS server following the instructions from the Deploy the NFS CSI and Example Server section.

Once Velero is configured to use the same backup location as the source cluster, it automatically discovers the available backups:

velero backup get
NAME                         STATUS      ERRORS   WARNINGS   CREATED                         EXPIRES   STORAGE LOCATION   SELECTOR
backup-demo-src-1747954979 Completed 0 0 2025-05-22 16:04:46 -0700 PDT 29d default <none>

Follow the steps in the Restore To A Different Namespace section to restore the backup on the target cluster.

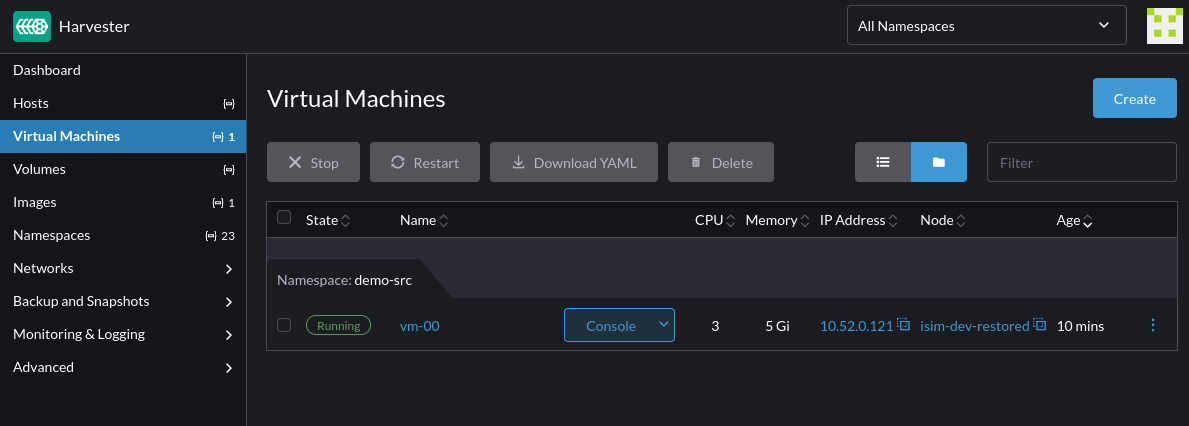
Remove the --namespace-mappings option to set the restored namespace to demo-src on the target cluster.

Confirm that the virtual machine and its configuration are restored to the demo-src namespace:

image

Select Longhorn Volume Snapshot Class​

To perform Velero backup and restore of virtual machines with Longhorn volumes, label the Longhorn volume snapshot class longhorn as follows:

kubectl label volumesnapshotclass longhorn velero.io/csi-volumesnapshot-class

This helps Velero to find the correct Longhorn snapshot class to use during backup and restore.

Limitations​

Enhancements related to the limitations described in this section are tracked at https://github.com/harvester/harvester/issues/8367.

  • By default, Velero only supports resource filtering by resource groups and labels. In order to backup/restore a single instance of virtual machine, custom labels must be applied to the virtual machine, and its virtual machine instance, pod, data volumes, persistent volumes claim, persistent volumes and cloudinit secret resources. It's recommended to backup the entire namespace and perform resource filtering during restore to ensure that backup contains all the dependency resources required by the virtual machine.

  • The restoration of virtual machine image is not fully supported yet.

· 4 min read
Hang Yu

Starting with Harvester v1.2.0, it offers the capability to install a Container Storage Interface (CSI) in your Harvester cluster. This allows you to leverage external storage for the Virtual Machine's non-system data disk, giving you the flexibility to use different drivers tailored for specific needs, whether it's for performance optimization or seamless integration with your existing in-house storage solutions.

It's important to note that, despite this enhancement, the provisioner for the Virtual Machine (VM) image in Harvester still relies on Longhorn. Prior to version 1.2.0, Harvester exclusively supported Longhorn for storing VM data and did not offer support for external storage as a destination for VM data.

One of the options for integrating external storage with Harvester is Rook, an open-source cloud-native storage orchestrator. Rook provides a robust platform, framework, and support for Ceph storage, enabling seamless integration with cloud-native environments.

Ceph is a software-defined distributed storage system that offers versatile storage capabilities, including file, block, and object storage. It is designed for large-scale production clusters and can be deployed effectively in such environments.

Rook simplifies the deployment and management of Ceph, offering self-managing, self-scaling, and self-healing storage services. It leverages Kubernetes resources to automate the deployment, configuration, provisioning, scaling, upgrading, and monitoring of Ceph.

In this article, we will walk you through the process of installing, configuring, and utilizing Rook to use storage from an existing external Ceph cluster as a data disk for a VM within the Harvester environment.

Install Harvester Cluster​

Harvester's operating system follows an immutable design, meaning that most OS files revert to their pre-configured state after a reboot. To accommodate Rook Ceph's requirements, you need to add specific persistent paths to the os.persistentStatePaths section in the Harvester configuration. These paths include:

os:
persistent_state_paths:
- /var/lib/rook
- /var/lib/ceph
modules:
- rbd
- nbd

After the cluster is installed, refer to How can I access the kubeconfig file of the Harvester cluster? to get the kubeconfig of the Harvester cluster.

Install Rook to Harvester​

Install Rook to the Harvester cluster by referring to Rook Quickstart.

curl -fsSLo rook.tar.gz https://github.com/rook/rook/archive/refs/tags/v1.12.2.tar.gz \
&& tar -zxf rook.tar.gz && cd rook-1.12.2/deploy/examples
# apply configurations ref: https://rook.github.io/docs/rook/v1.12/Getting-Started/example-configurations/
kubectl apply -f crds.yaml -f common.yaml -f operator.yaml
kubectl -n rook-ceph wait --for=condition=Available deploy rook-ceph-operator --timeout=10m

Using an existing external Ceph cluster​

  1. Run the python script create-external-cluster-resources.py in the existing external Ceph cluster for creating all users and keys.
# script help ref: https://www.rook.io/docs/rook/v1.12/CRDs/Cluster/external-cluster/#1-create-all-users-and-keys
curl -s https://raw.githubusercontent.com/rook/rook/v1.12.2/deploy/examples/create-external-cluster-resources.py > create-external-cluster-resources.py
python3 create-external-cluster-resources.py --rbd-data-pool-name <pool_name> --namespace rook-ceph-external --format bash
  1. Copy the Bash output.

Example output:

export NAMESPACE=rook-ceph-external
export ROOK_EXTERNAL_FSID=b3b47828-4c60-11ee-be38-51902f85c805
export ROOK_EXTERNAL_USERNAME=client.healthchecker
export ROOK_EXTERNAL_CEPH_MON_DATA=ceph-1=192.168.5.99:6789
export ROOK_EXTERNAL_USER_SECRET=AQDd6/dkFyu/IhAATv/uCMbHtWk4AYK2KXzBhQ==
export ROOK_EXTERNAL_DASHBOARD_LINK=https://192.168.5.99:8443/
export CSI_RBD_NODE_SECRET=AQDd6/dk2HsjIxAA06Yw9UcOg0dfwV/9IFBRhA==
export CSI_RBD_NODE_SECRET_NAME=csi-rbd-node
export CSI_RBD_PROVISIONER_SECRET=AQDd6/dkEY1kIxAAAzrXZnVRf4x+wDUz1zyaQg==
export CSI_RBD_PROVISIONER_SECRET_NAME=csi-rbd-provisioner
export MONITORING_ENDPOINT=192.168.5.99
export MONITORING_ENDPOINT_PORT=9283
export RBD_POOL_NAME=test
export RGW_POOL_PREFIX=default
  1. Consume the external Ceph cluster resources on the Harvester cluster.
# Paste the above output from create-external-cluster-resources.py into import-env.sh
vim import-env.sh
source import-env.sh
# this script will create a StorageClass ceph-rbd
source import-external-cluster.sh
kubectl apply -f common-external.yaml
kubectl apply -f cluster-external.yaml
# wait for all pods to become Ready
watch 'kubectl --namespace rook-ceph get pods'
  1. Create the VolumeSnapshotClass csi-rbdplugin-snapclass-external.
cat >./csi/rbd/snapshotclass-external.yaml <<EOF
---
apiVersion: snapshot.storage.k8s.io/v1
kind: VolumeSnapshotClass
metadata:
name: csi-rbdplugin-snapclass-external
driver: rook-ceph.rbd.csi.ceph.com # driver:namespace:operator
parameters:
clusterID: rook-ceph-external # namespace:cluster
csi.storage.k8s.io/snapshotter-secret-name: rook-csi-rbd-provisioner
csi.storage.k8s.io/snapshotter-secret-namespace: rook-ceph-external # namespace:cluster
deletionPolicy: Delete
EOF

kubectl apply -f ./csi/rbd/snapshotclass-external.yaml

Configure Harvester Cluster​

Before you can make use of Harvester's Backup & Snapshot features, you need to set up some essential configurations through the Harvester csi-driver-config setting. To set up these configurations, follow these steps:

  1. Login to the Harvester UI, then navigate to Advanced > Settings.
  2. Find and select csi-driver-config, and then click on the ⋮ > Edit Setting to access the configuration options.
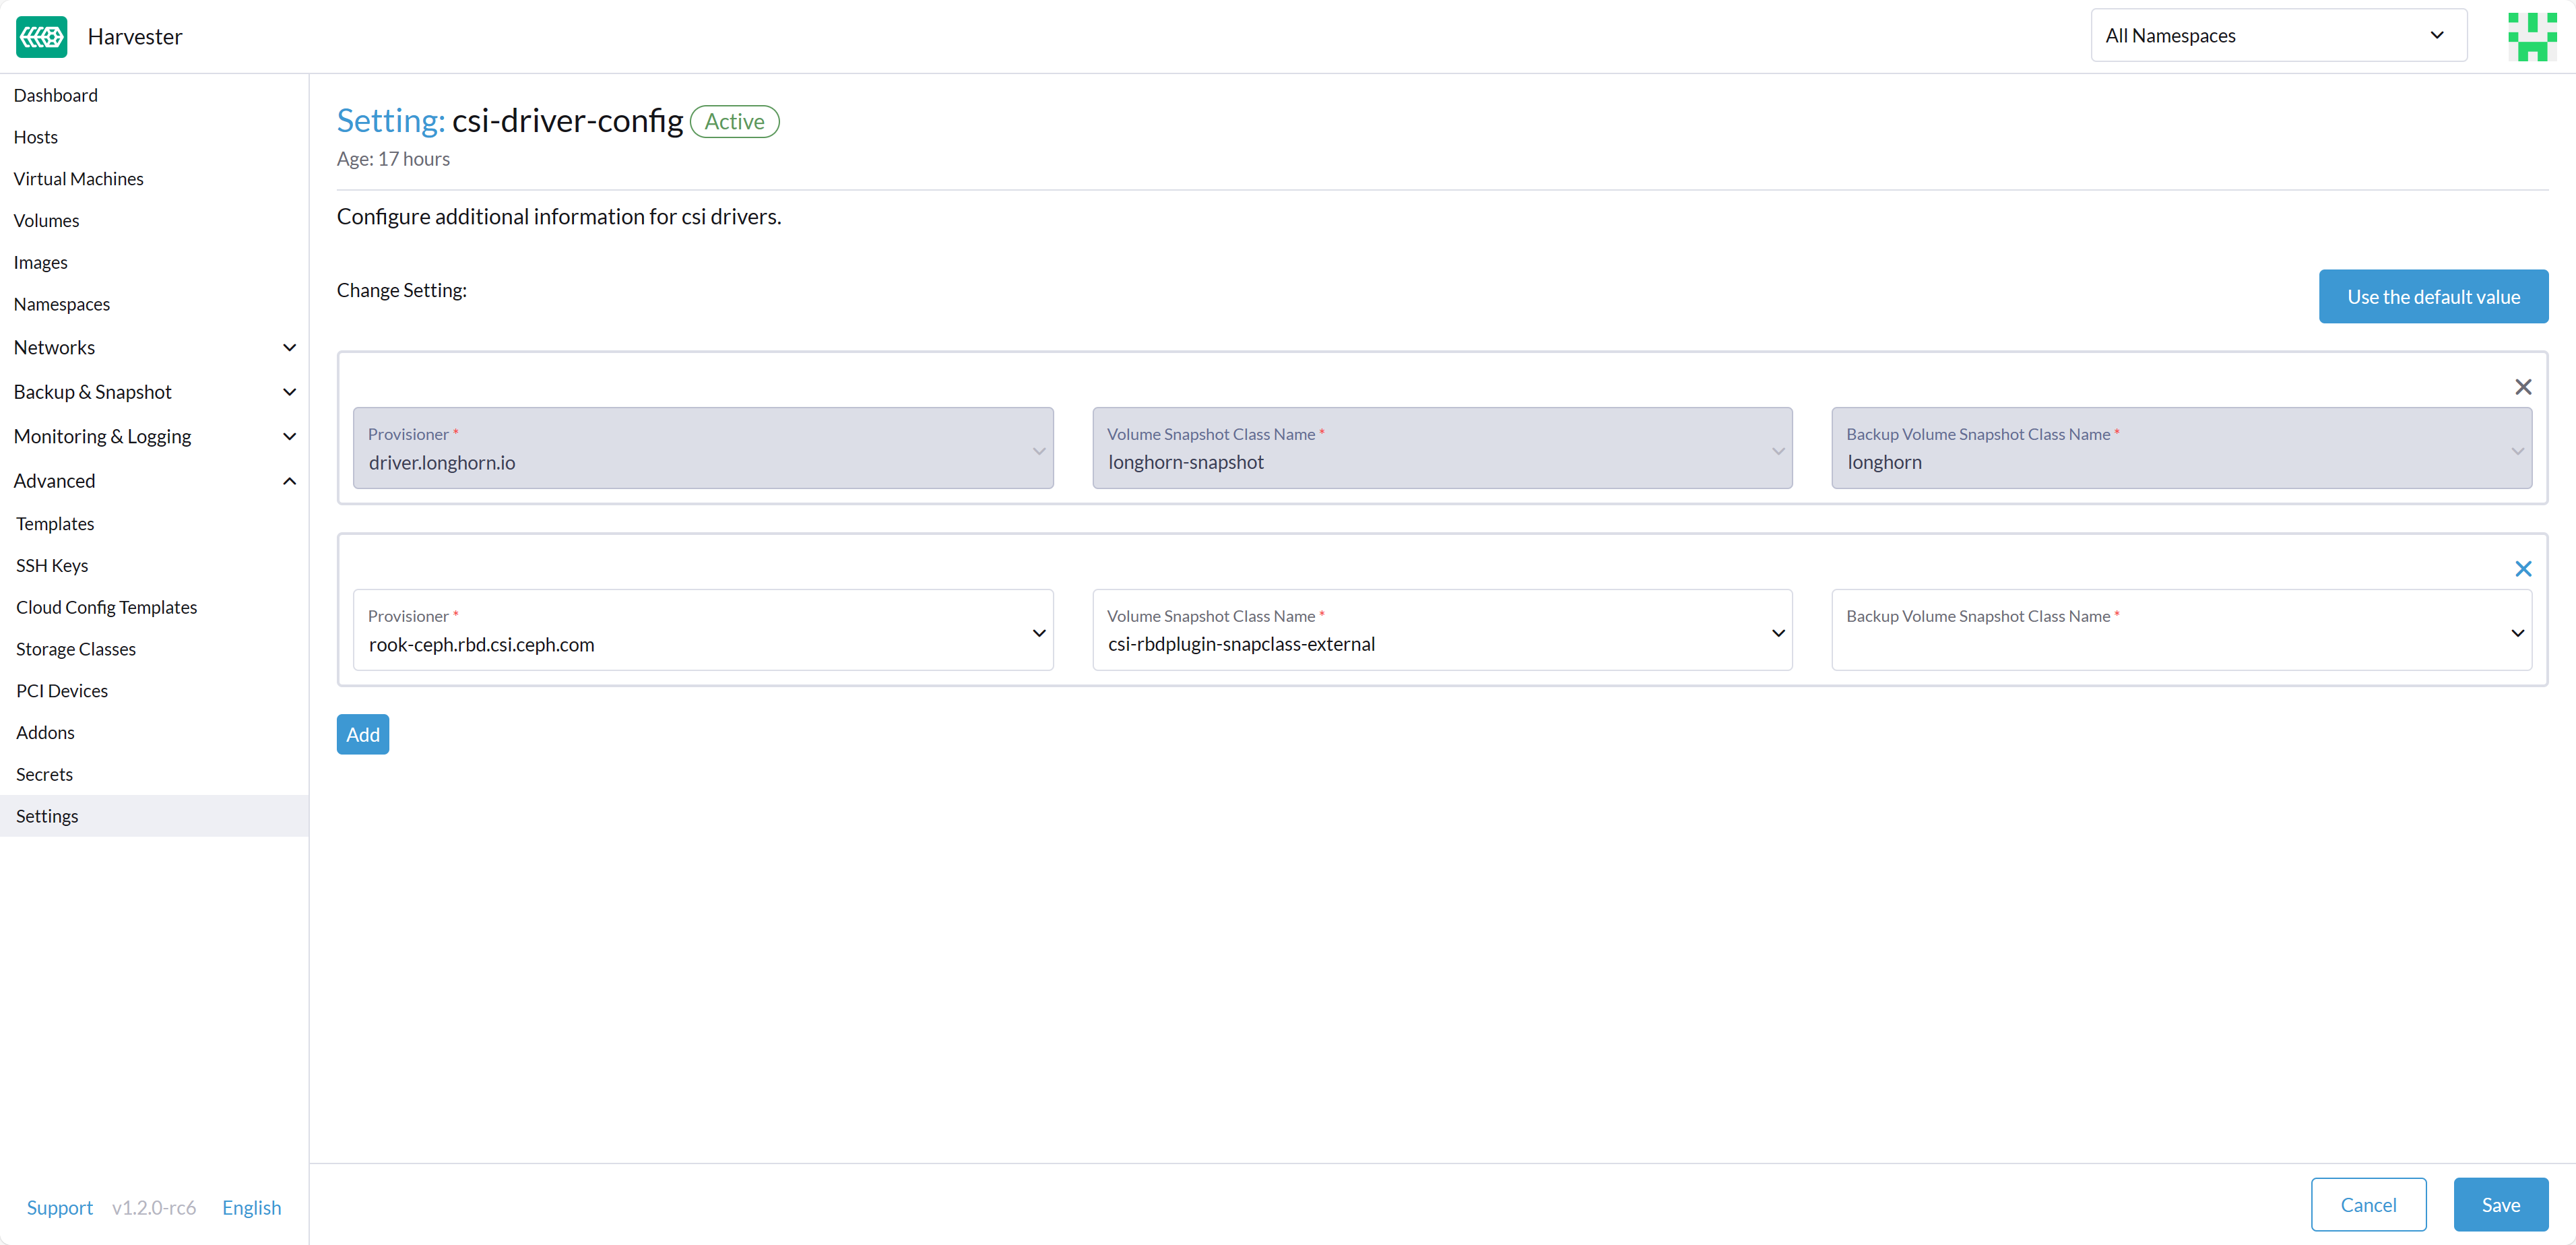
  3. In the settings, set the Provisioner to rook-ceph.rbd.csi.ceph.com.
  4. Next, specify the Volume Snapshot Class Name as csi-rbdplugin-snapclass-external. This setting points to the name of the VolumeSnapshotClass used for creating volume snapshots or VM snapshots.

csi-driver-config-external

Use Rook Ceph in Harvester​

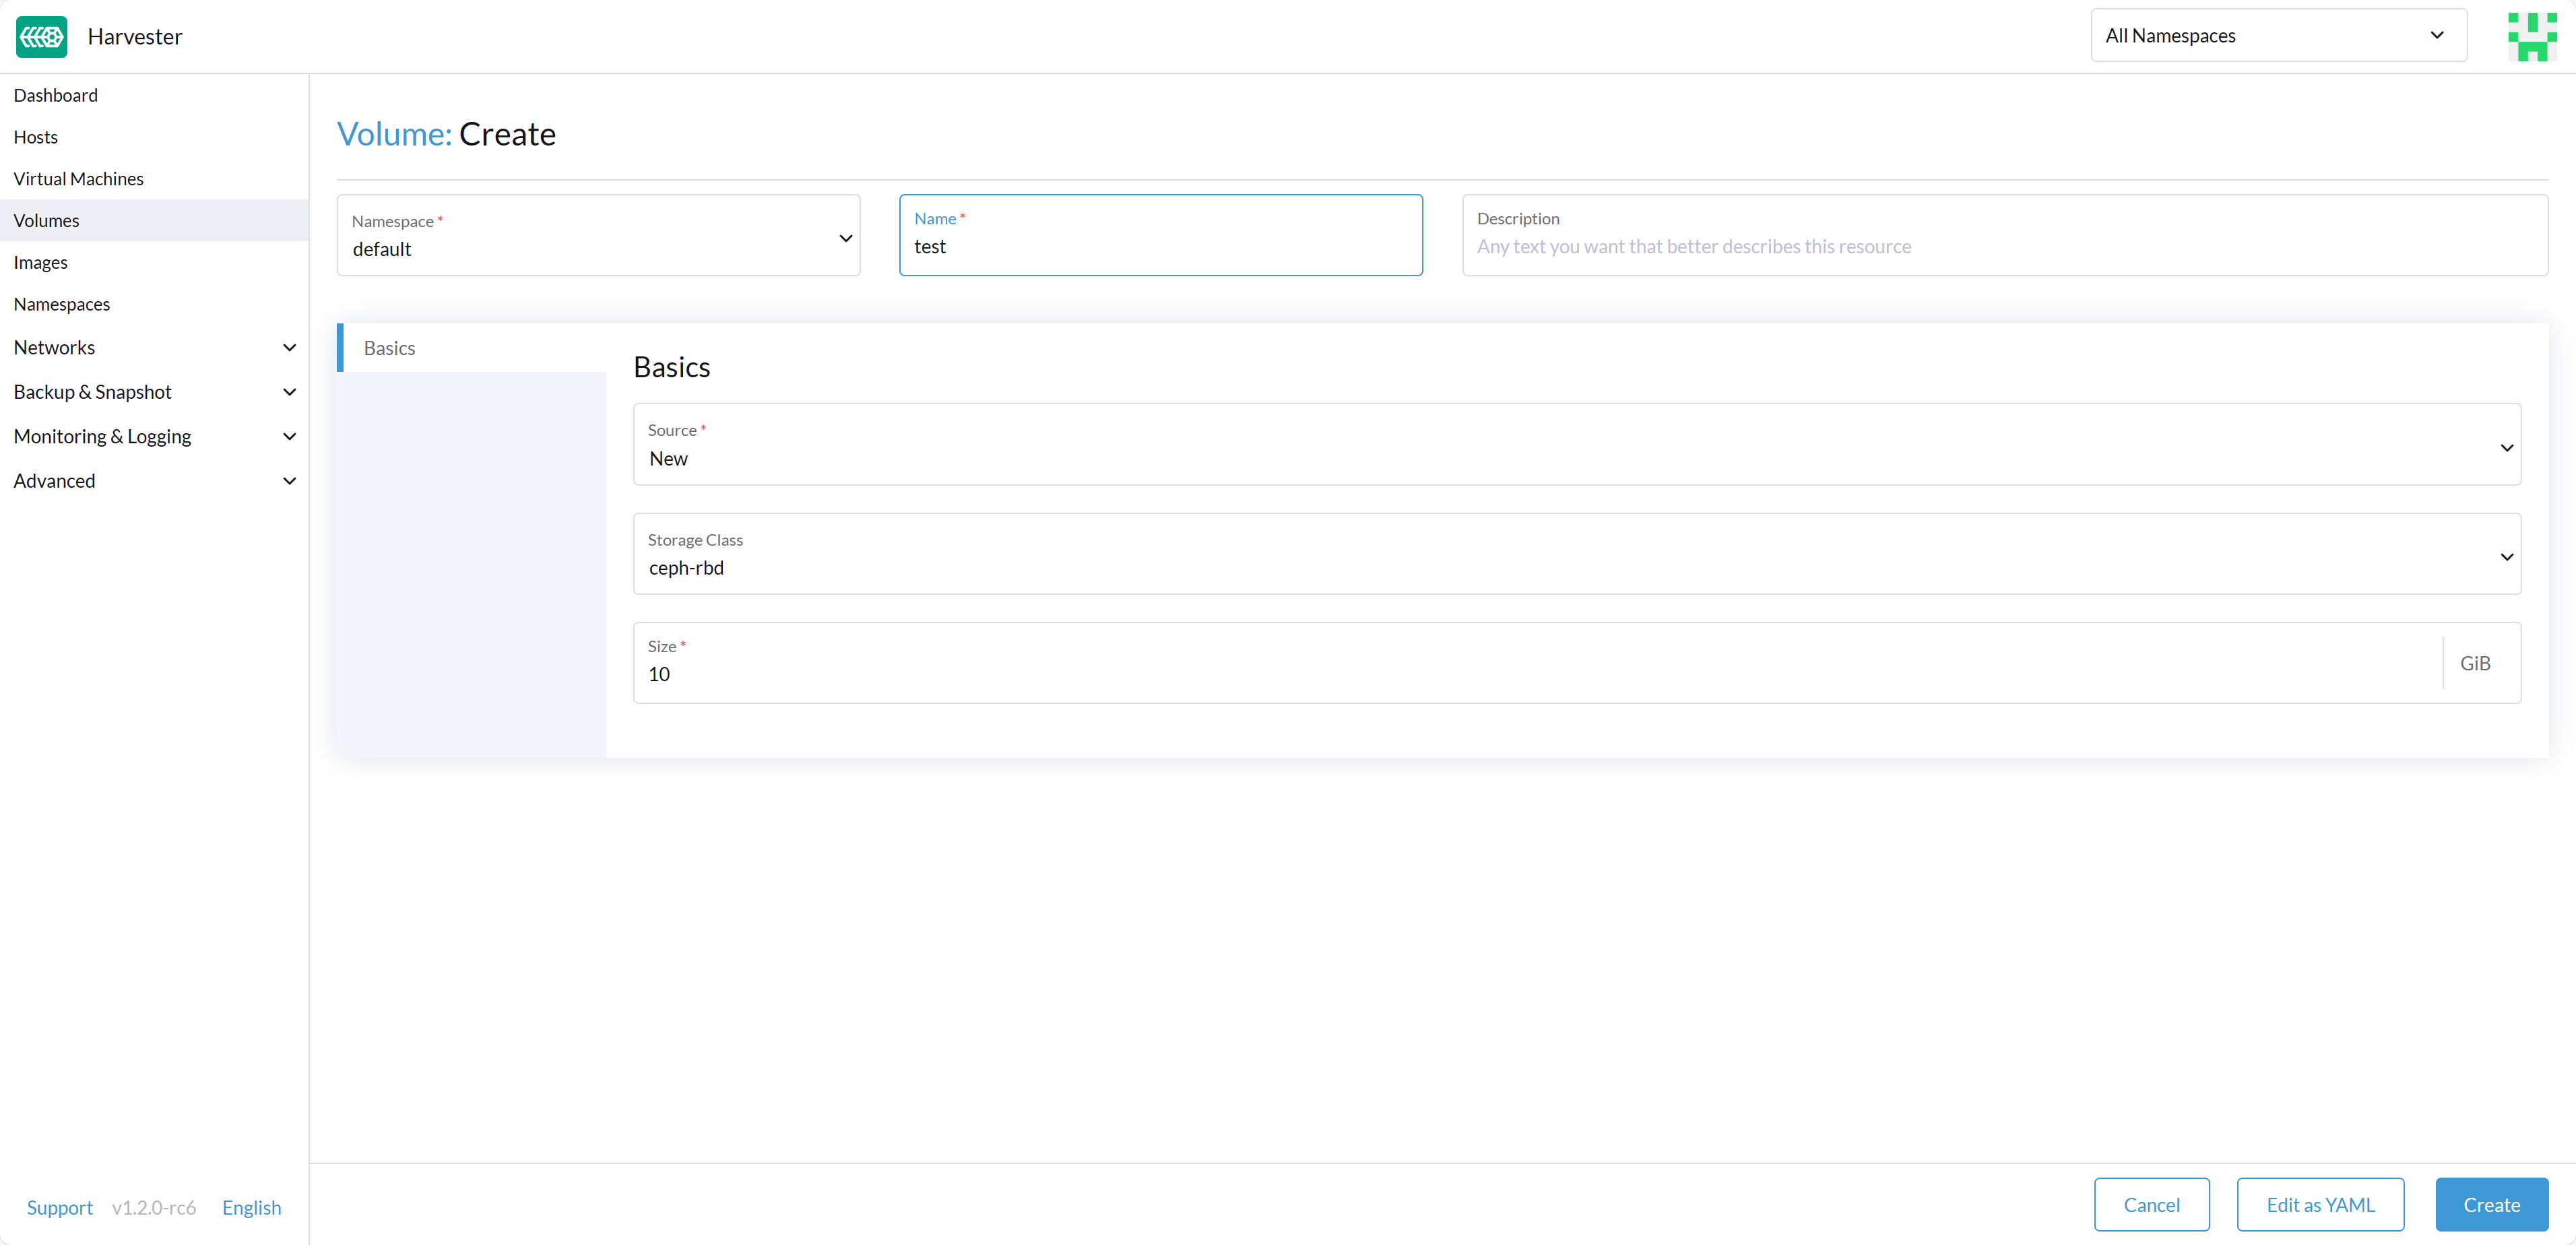
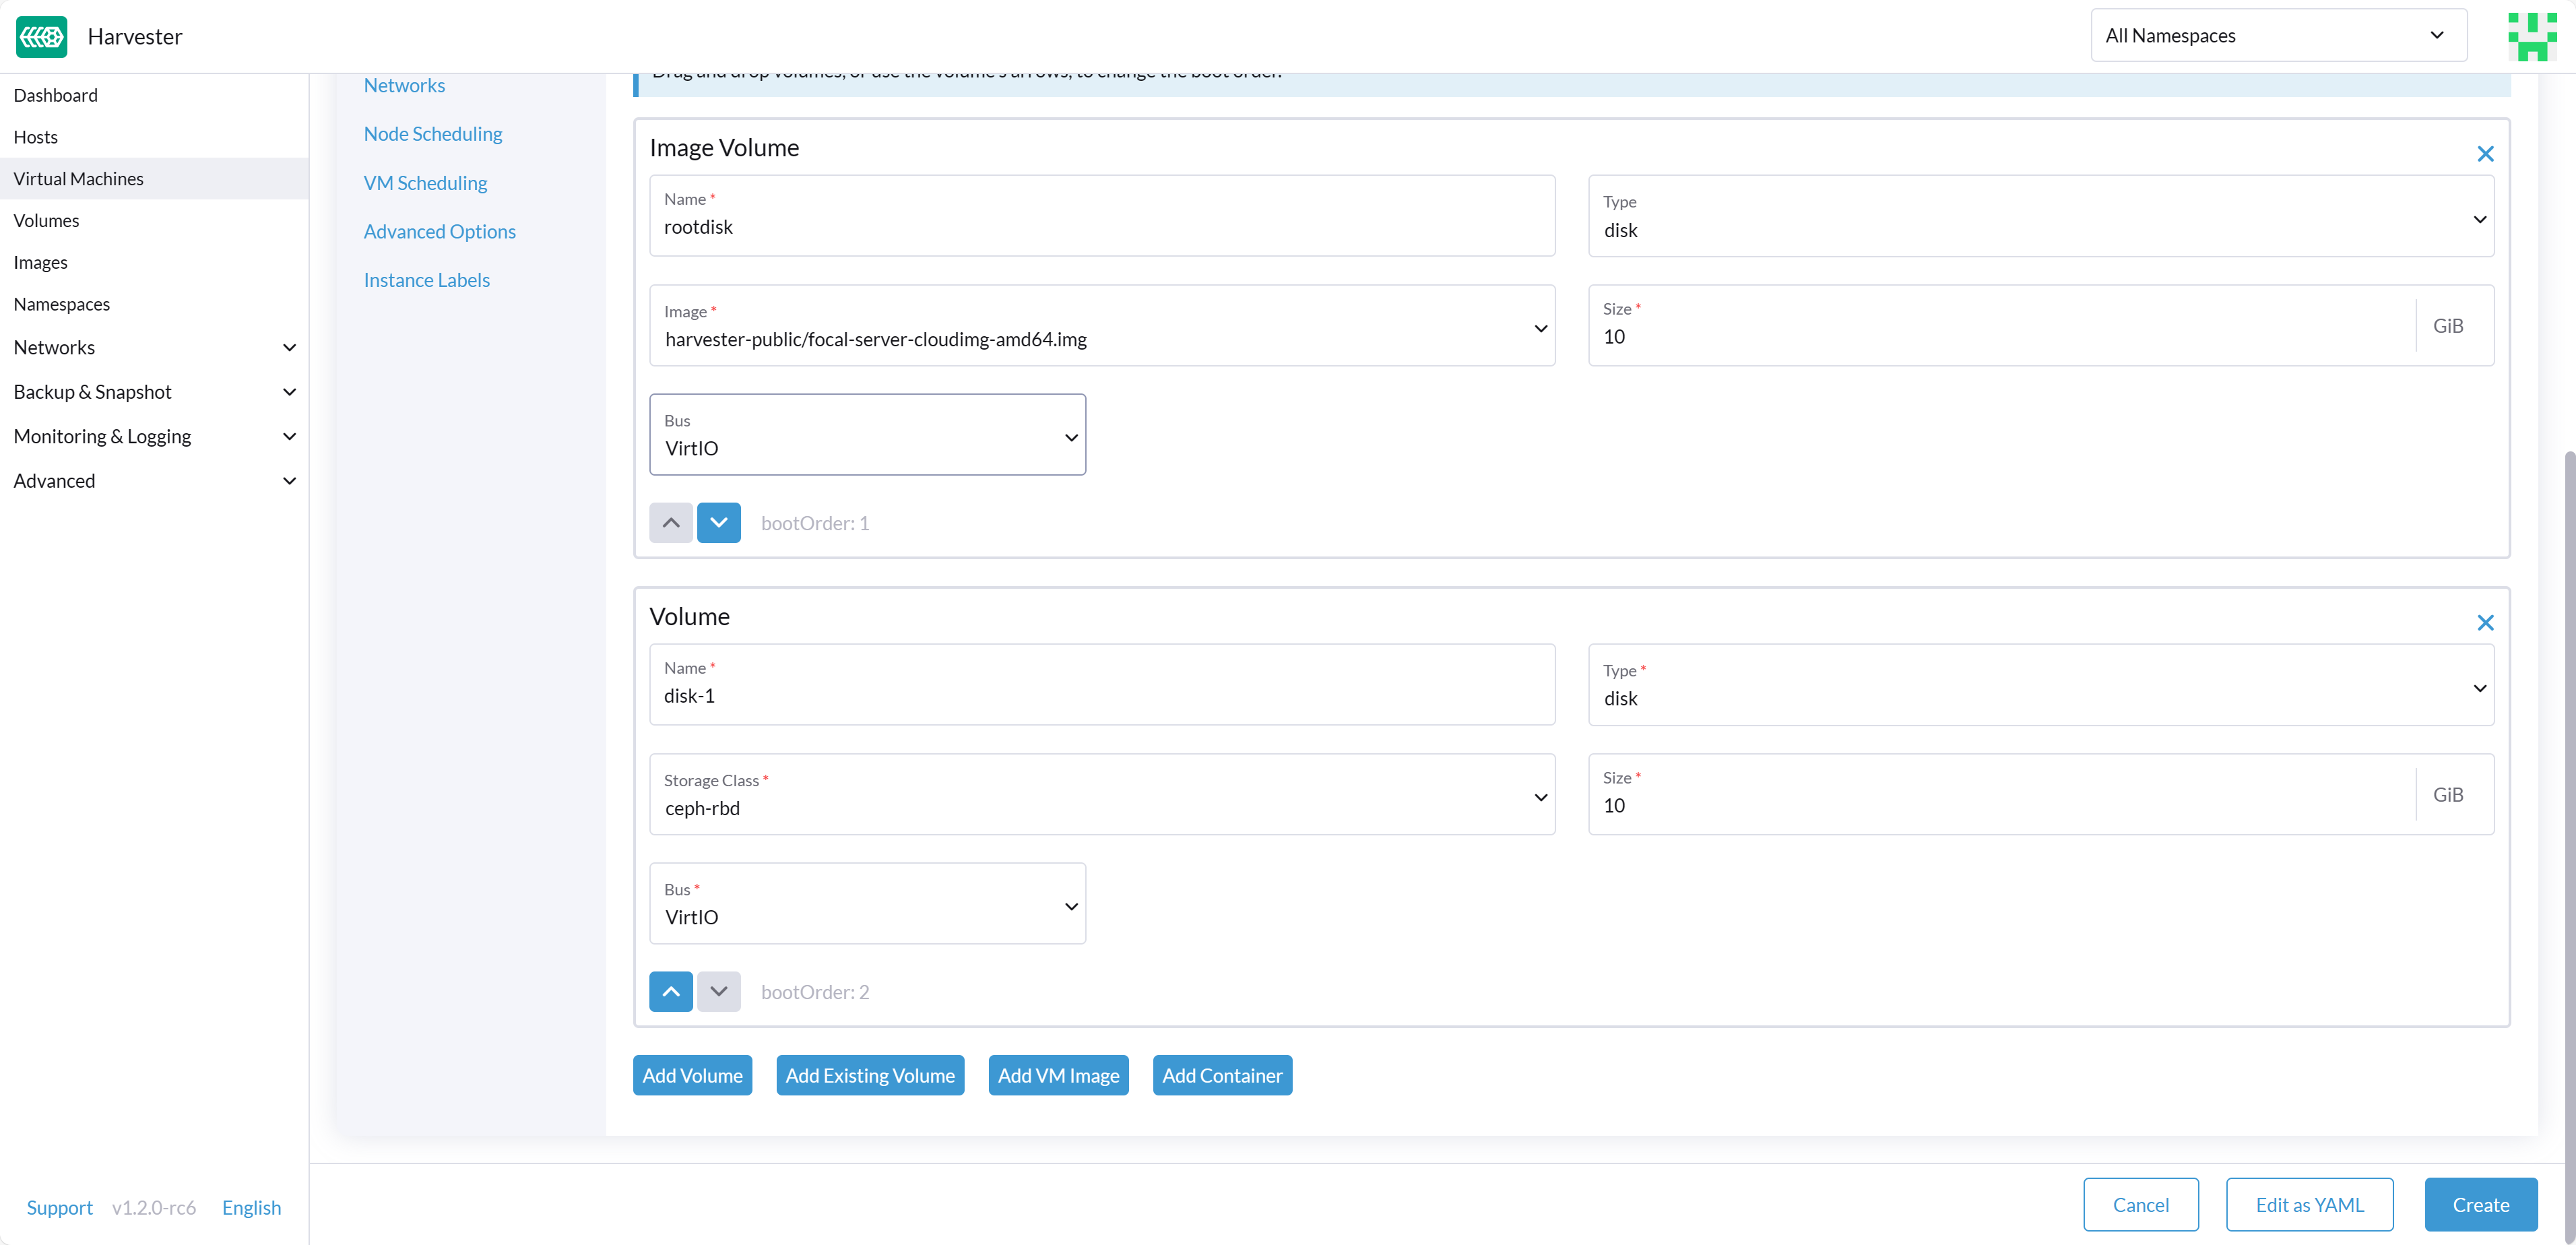
After successfully configuring these settings, you can proceed to utilize the Rook Ceph StorageClass, which is named rook-ceph-block for the internal Ceph cluster or named ceph-rbd for the external Ceph cluster. You can apply this StorageClass when creating an empty volume or adding a new block volume to a VM, enhancing your Harvester cluster's storage capabilities.

With these configurations in place, your Harvester cluster is ready to make the most of the Rook Ceph storage integration.

rook-ceph-volume-external

rook-ceph-vm-external